

Last Updated on October 20, 2023
Are you thinking of using managed properties in your SharePoint sites?
Managed properties are great if you want to use powerful query functions like with the highlighted content web part and keyword query language.
In this article, I’ll share all the important bits of SharePoint managed property like how they are automatically created and how to create your own.
Let’s get started.
Table of Contents:
To understand managed properties more clearly, let’s start with identifying the two types of properties you can find in SharePoint.
Those are:
- Crawled properties
- Managed properties
Crawled properties, from the name itself, are the resulting properties after the indexer crawled the contents of your site.
Managed properties are like a level higher than crawled properties since you can use them when querying and manipulating metadata.
Note: If you need a fresher on the differences between crawled and managed properties in SharePoint, kindly read this article.
That’s not to say crawled properties are useless. Through them, various metadata are now discoverable with search — even individual cells or items in a file.
For example:
In a document library I once created that contains insurance policies, I can search for a policy number and the search will then show the lists and files that contain the search query.

Unfortunately, in terms of use cases, that’s the extent of it. I can’t use them for more advanced functionalities in SharePoint.
Unlike crawled properties, you can use managed properties for things like:
- Aggregating files from multiple sources
- Aggregating news posts from different sites
- Applying retention labels automatically based on metadata alone
- Use keyword query language in search
- Hide items from Delve
For example, I can show in highlighted content certain files that match the filter criteria all across the sites in the tenant (more on this example later).
Note: If you need more help in understanding how SharePoint search works, check out the beginner’s search guide I wrote that talks about it in more detail.
Sign up for exclusive updates, tips, and strategies
How to access managed properties
Managed properties (as well as crawled properties) are found on
the search schema page right inside the admin center of SharePoint.
If you want to access all the managed (and crawled) properties, follow these steps:
First, if you’re coming from your SharePoint site, click on the app launcher on the upper-right left portion of the page and on the “Admin” button.
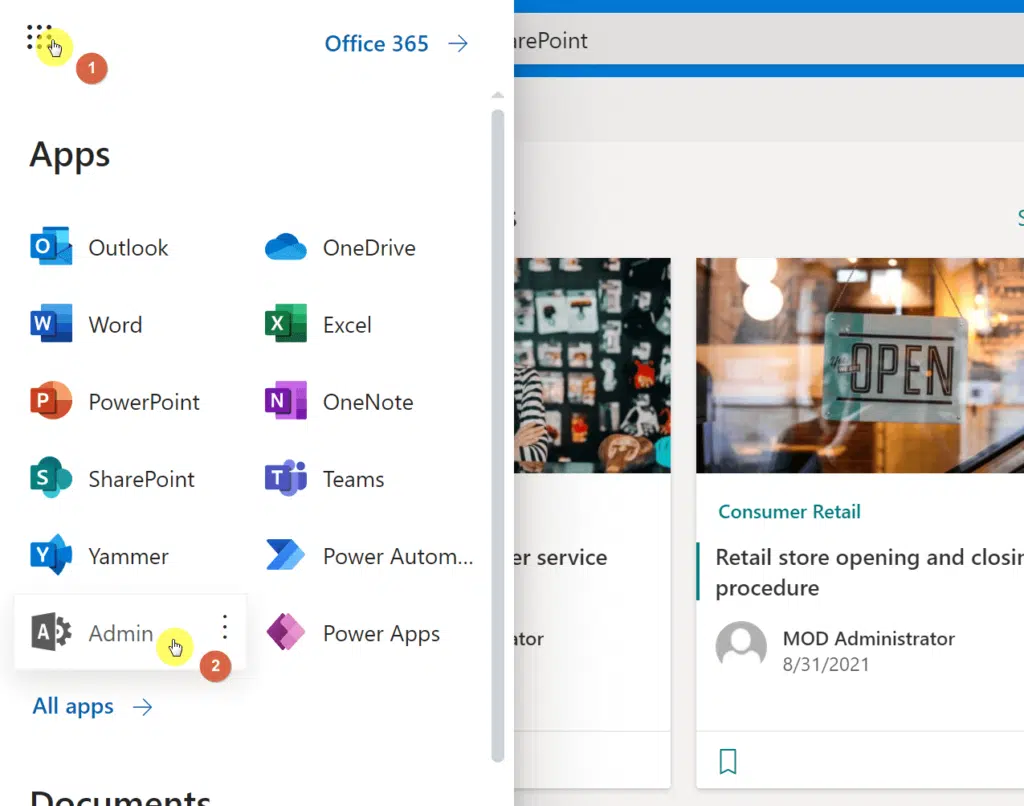
This will bring you to the Microsoft 365 admin page. You can also get here by clicking on this link if you don’t have a SharePoint or Microsoft tab opened:
https://admin.microsoft.com/
Note: It will greatly help if you bookmark the links that you will be visiting in the future. I got a list of all Microsoft 365 admin portal links that might help.
Once there, focus your attention on the left panel. Expand all the options for “Admin centers” and click on the “SharePoint” button.

Now that you’re in the SharePoint admin center, click on the “More features” menu on the left panel and find the “Search” section.
Once you found it, click on the “Open” button.

On the next page, click on the “Manage Search Schema” link to proceed.

Right after that, you will land on the “Managed Properties” tab where you can see and search all the managed properties in your tenant.

That’s it. You can also explore the next tab to see all the crawled properties in your tenant (we will touch on this later when creating your own managed properties).
How managed properties are automatically created
As I wrote at the start of this article, some managed properties are automatically created by the system (without you lifting a finger).
Let’s look at the instances or scenarios where this happens:
1. Creating metadata columns at the site level
Every time you create a new metadata column at the site level, the system automatically creates a managed property for that column as well.
As the name implies, site columns can be applied to all lists and libraries on the site — as opposed to list or library-level columns only.
When I wrote the beginner’s guide on how to use metadata in SharePoint, I created a site-level column called “Field” in a sample document library.

This resulted in a crawled property first (though this is only the system indexing the column).

When I searched for it on the managed properties, here’s what I found:

If you look at one of the fields in the managed properties tab, you will find these automatically created managed properties don’t show any mapped crawled properties.
The reason for that is stated in this Microsoft documentation article:
The search schema displays the name of auto-generated managed properties and their mappings to crawled properties in grey in the search schema. The search schema doesn't hold the settings of the managed auto-generated managed properties. The settings exist, but they're hidden from the search schema.
2. Default system metadata
The system also creates managed properties automatically from the default metadata columns you normally find in a list or library.
This includes columns like:
- Title
- Modified
- Modified By
- Created by
For example:
If I search for those columns in the managed properties list, I’ll get results along with their mapped crawl properties:

Here’s another one:

3. Term Store Metadata
When you create a new “Managed metadata” column on a list or library — and point or define it through the term store — then the system will automatically create a managed property.
If you’re a little confused about what I mean, when you create a new column on a list or library, you can choose “Managed metadata” as the column type.

In this scenario, it will not matter if the column you created is site-wide or simply exclusive to that list or library — it will still create a managed property.

If you check on the crawled properties, you will see it displayed:
The same can be found on the managed properties list:

Note: In the same way you create a site-level metadata column yourself, the system will not show the mapped crawled properties for the same reason found in the first scenario.
If you want to create your own managed properties, then you will be happy to know that it really isn’t that complicated.
In fact, after opening the “Managed Properties” tab, you have likely seen the “New Managed Property” button already.

However, I don’t recommend this path. If you do so, you will notice that whatever managed properties came out from this, you will not be able to use it as a refiner.

That means you will not be able to use the property as a way to refine the search results on the front end (which also applies to the highlighted content web part).
The best way forward is to create refinable managed properties instead of making use of built-in managed properties that are already in SharePoint.
Now, there are different types of refinable managed properties in SharePoint — and you must use the one that corresponds to the correct property type:
- RefinableDate
- RefinableDecimal
- RefinableDouble
- RefinableInt
- RefinableString
Note: If you want to read more regarding refiners, check out this documentation about enabling a managed property to be a refinable managed property.
Introduction to mapping refinable properties
To better understand what we’re doing here, I created two new document libraries in two different sites in the same tenant.
In the first one, I created a choice column to tag the different articles:

The second one is fairly similar, though I gave the column another name:

Both document libraries have the same choices — though the columns are quite different.
By creating a managed property that maps to these columns, we will be able to search across these libraries on different sites for items tagged with a specific topic.
Yes, it’s quite possible to map a single managed property to multiple crawled properties.
In our example:
If you search for “topic” crawled properties, you will get a hit for different properties — one for each of the document libraries I created since they have different names:

Now, since these columns are made up of texts or strings, we will have to use the RefinableString type.
How to map a refinable managed property to multiple crawled properties
One thing you need to know is that RefinableString starts from 00 to 199:
If this is the first time you created a refinable managed property, then you can start with RefinableString00. Otherwise, use the next available RefinableString.
Go to the “Managed Properties” tab and search for “RefinableString00” or the next one that you haven’t used yet.
After that, click on its dropdown button and select “Edit/Map Property” from the options.

As a refinable managed property, you will not be able to change its property name and property. Scroll down to the bottom until you can see the option to map to crawled properties.
Click on the “Add a Mapping” button to proceed.

A window will then appear where you can search for a crawled property to map the text managed property.
Using our example, I’ll simply search for “topic” and select the ones that correspond to the document libraries created.
Note: When selecting a crawled property, you will have to do it one at a time. The window will not allow you to select more than one property, unfortunately.
Click on the “OK” button to continue.

After that, check the mapped crawled properties box to make sure you selected the correct crawled properties.
Once you can confirm that, click on the “OK” button.

Congratulations! You have now successfully created a managed property that’s mapped to different crawled properties.
Before you can use the newly managed property in any search function, you will have to reindex the document library connected to that property.
According to the documentation:
When you have changed a managed property, or when you have changed the mapping of crawled and managed properties, the site must be re-crawled before your changes will be reflected in the search index. Because your changes are made in the search schema, and not to the actual site, the crawler will not automatically re-index the site.
They also added the following lines:
You can also choose to only re-index a document library or a list. When you have changed a managed property that's used in a library or list, or changed the mapping of crawled and managed properties, you can specifically request a re-indexing of that library or list only.
Fortunately, reindexing a document library (or a list) is easy enough and can be done in a few seconds only.
While in the document library, click on the gear icon and select “Library settings” next.
The reindex option can be found on the “Advanced settings” page, so head there next.

Scroll down a little until you see the “Reindex Document Library” button. Click on it and confirm your decision in the window.

Do that for all the document libraries and lists that contain the crawled properties mapped.
Note: Microsoft doesn’t reveal the actual schedule for re-indexing. Some sources say that the schedule generally takes between 15 minutes to an hour between upload and availability.
Once the system finishes reindexing, you will be able to use the refined managed property for various functions.
In this example, we will use the highlighted content web part to display documents from different libraries on different sites that match our criteria.
Note: If you want to read more on all the available web parts in SharePoint Online, I made a list of all of them and what each of them is for.
First, you need to add the highlighted content web part on a page. Then, hover your mouse over it and click on the pencil icon of the web part.
Then, start configuring the web part with the following:
- Choose the “Filter” function
- Set the “Source” to “All sites”
- Select the type of content to display (which is “Documents” in our example)

Continue with the following:
- Set the “Filter” to “Managed property”
- Search for “refinable” and the other options will be available
- Select the property name (in this case, it’s “RefinableString00”)
- On the bottom part, enter the tag to filter (in this case, it’s “Microsoft 365”)

Watch as the highlighted content web part shows you documents from the libraries on different sites according to the tag you have set:

Awesome, right? However, if you have some questions about it, please write them down in your comment below.
For inquiries and other concerns, please send me a message through this contact form here and I’ll get back to you as soon as possible.


Hi.
I followed the steps below, within my site i created a choice column i used it on one of the libraries, but when i go to the Admin Centre/Search, I cannot see my column under Crwaled Properties or Managed Properties. Do i need to create the New Managed Property instead?
Thank you
Hi Marina, I can see your post is 10 months old. Not sure of what your issue was, but this may of benefit to other readers. If your site is a Team Site connected to a Microsoft 365 Group then you will need to add your account as a Site Collection Administrator. You ca do this by going to the team site where the metadata and documents are and click the gear in the too right, then click on Site Permissions, then click on Advanced Site Permissions, then click on Site Collection Administrators and add your name there. Wait about… Read more »
Hi,
I managed to create multiple managed properties as RefinableString properties.
I can also use them in the highlighted content WebPart but because you can’t change the name do I have to remember all the crawled properties that are mapped to them, or is there an easier way?
Very valuable information, TX for sharing