

Last Updated on November 16, 2023
Did you delete something by accident?
If so, there’s no need to worry. SharePoint has a recycle bin where you can easily restore anything you may have deleted.
In this article, let’s talk about the recycle bin in SharePoint and what you need to know about it like where to find it, how to restore a file, and many others.
Let’s get started.
Table of Contents:
As you may already know, a recycle bin temporarily stores all the deleted items. It’s also the place where you can restore what you deleted.
Specifically, this is where the following things go when they are deleted:
- Documents
- Folders
- Events
- Site pages
- Document libraries
- Site lists
- Files and folders from the synchronized OneDrive
In SharePoint, there are two stages of how files are stored in the recycle bin:
1. First-Stage Recycle Bin (Site Recycle Bin)
This is the most accessible recycle bin that a regular with an edit permission level can access. This is where the file goes when you delete it from your site.
Currently, items deleted will remain for 93 days in the recycle bin. Even if the file is already in this recycle bin, it still counts against your storage quote and list view threshold.
If you empty this recycle bin, the files will move on to the next stage recycle bin where a site collection admin can still restore it.
2. Second-Stage Recycle Bin (Site Collection Recycle Bin)
This recycle bin is only accessible to site collection admins. Items deleted from the first-stage recycle bin will stay here for 93 days.
On the other hand, there are some conditions that may change that timeframe:
- The recycle bin (second-stage) has already exceeded its quota.
- The site collection admin manually deleted the files from the second-stage recycle bin.
The site collection recycle bin has a 200% space allocation from the site collection quota. You can’t change this configuration.
Who can access and restore files in the recycle bin?
The first-stage recycle bin (site recycle bin) is accessible to all members who have an edit permission level. Naturally, site or group owners can access it too.
Those who have a read permission level will not be able to see the recycle bin and access its contents.
The same goes for the restoration of files — anyone with an edit permission level can restore any deleted file (except for list and libraries) on the site — with a caveat:
You must have the correct permission level first on that file before it is deleted. Meaning, you can’t restore a file that you originally don’t have access to.
Deleted lists and libraries are a special case since only site owners or the users who deleted the list or library can restore it.
If you want to read more about permissions, I wrote an article about how permission levels work in SharePoint.
Sign up for exclusive updates, tips, and strategies
The recycle bin is easy to find — though it depends on the site template that you’re using.
Team Site Recycle Bin
For modern team sites, you can conveniently find the recycle bin on the quick launch (site navigation) panel on the left side.

If you can’t find the recycle bin on the site navigation panel, it either means:
- The publish feature is enabled on your site features.
- A site admin hid it from the site settings.
If that’s the case, don’t panic. You can still access the recycle bin from the site contents page — it’s on the right side of the command bar.

Communication Site Recycle Bin
For communication sites, you will not be able to find the recycle bin on the site navigation panel since the site is designed to deliver messages to its readers.
However, you will still find it on the site contents page:

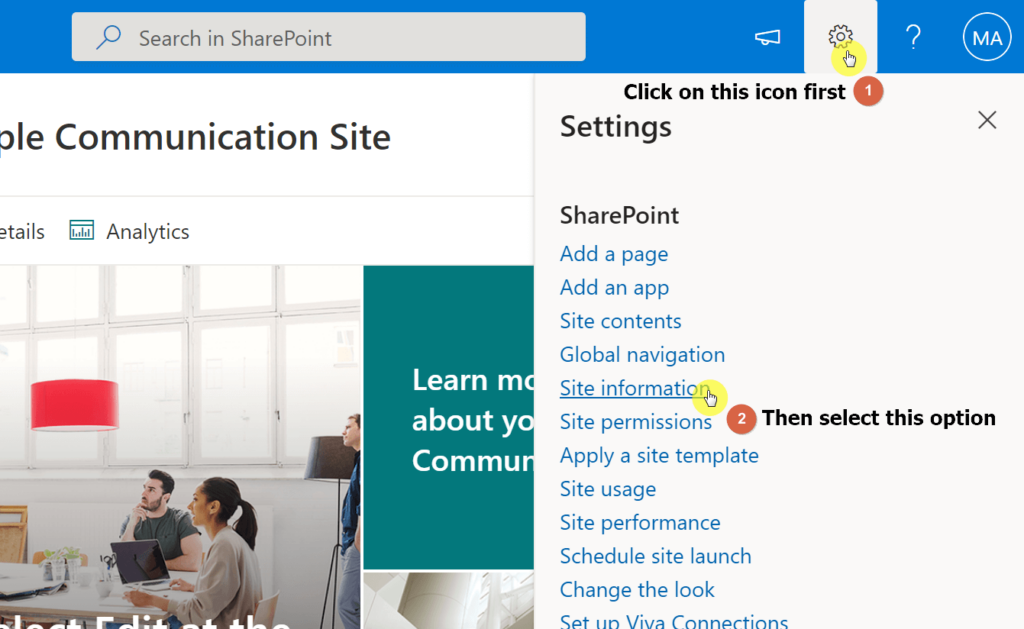
In case you don’t know how to get to the site contents page, simply click on it from the navigation panel or from the gear icon.

Site Collection Recycle Bin
To get to the second-stage recycle bin, you need to navigate to the site settings page first.
Click on the gear icon of your site and click on “Site information”.
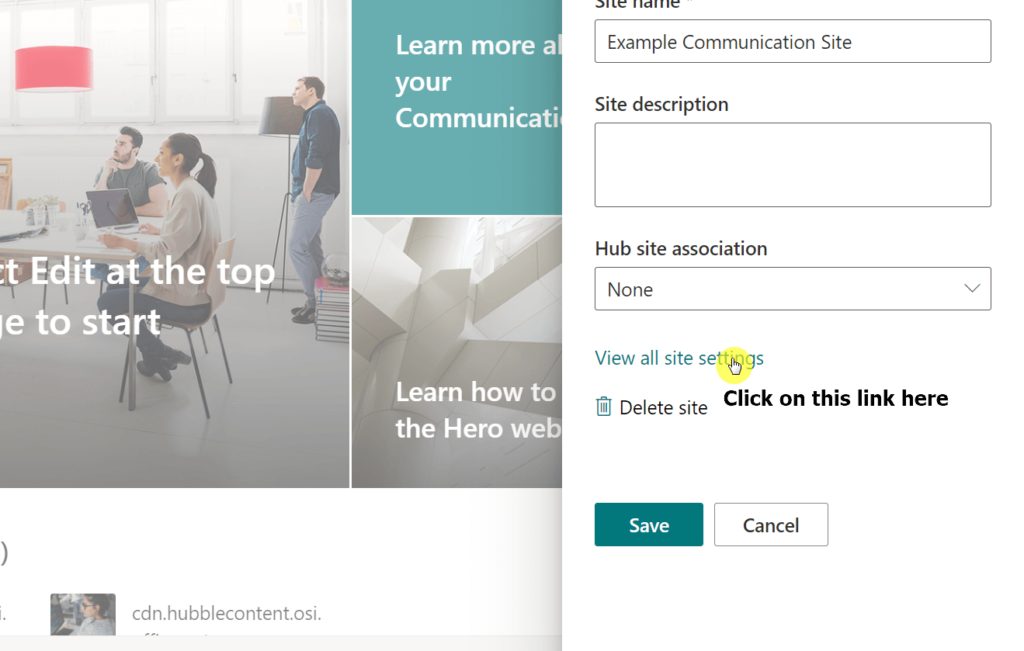
After that, click on the “View all site settings” link on the right panel.
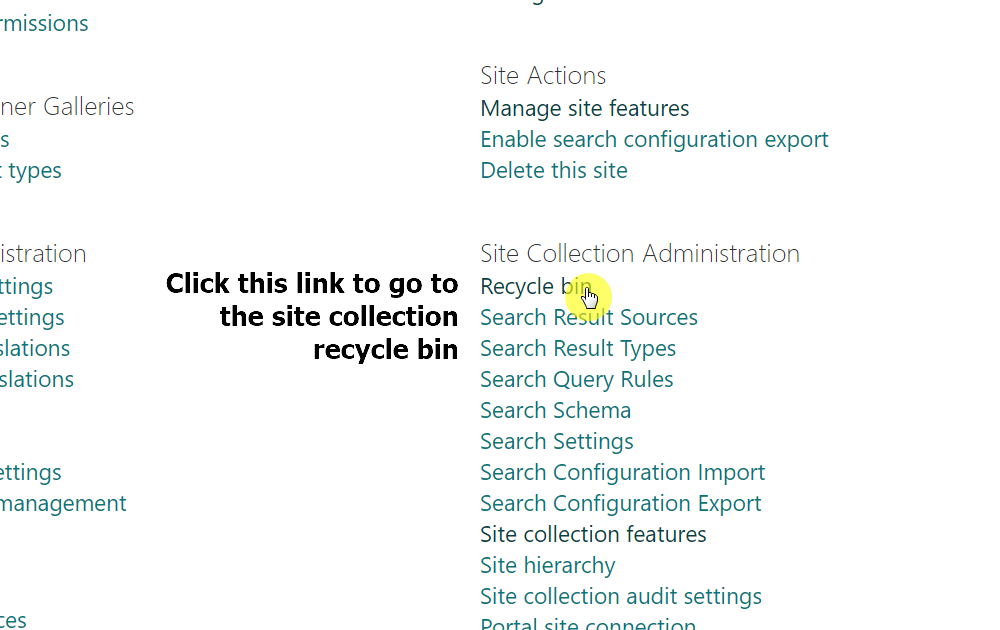
Under “Site Collection Administration”, click the “Recycle bin” link.
How to restore content from the recycle bin
Restoring content from the recycle bin works fairly the same whether on the first-stage or on the second-stage recycle bin.
To restore something from the recycle bin, simply select it and click on the “Restore” button on the command bar.
You can also select all the items and restore everything in bulk.

If what you deleted is a site, the process is the same — but you have to do it from the admin center. Check out this article to read more.
How to set up an alert for deleted items
Since deleted files will not stay in the recycle bin forever, it’s important to keep up to date with any file deletions especially if you’re not the only admin.
Fortunately, it’s quite easy to do. In fact, there’s now an automatic feature where an email is automatically sent to you when someone deletes a large number of files at once.
According to Sarah Haase’s explanation:
If a large number of files are deleted from a user’s OneDrive for Business account, the user will receive an email notification with instructions on how to restore their files from the recycle bin. Users that delete a large number of files from a SharePoint Online site will also receive an email notification with instructions on restoring those files.
Sarah Haase
The problem, unfortunately, is determining the exact number of files that must be deleted before this notification happens.
Microsoft didn’t provide an exact number or even ratio of file deletions that will meet the notification threshold.
You must not treat this as the first line of defense. For that reason, you need to set up your own alerts, especially on important lists and libraries.
Email Notification for Deleted Items
With the modern experience, setting up alerts is now easier than ever. In fact, in SharePoint Online, you can even set up an alert for a specific item only on a list or library.
To set up an alert on a list or library, go to that list or library first.
Then, click on the “Alert me” option on the command bar.

If you want to set it up on a specific item only, then right-click on that item and click the “Alert me” option.

After that, a window will appear you can configure the alert — its frequency, recipient, and delivery method.
Since the goal is to create an alert for a deleted item, go to the “Change Type” settings and make sure to select “Items are deleted”.
You can decide on a filter for these alerts as well as the frequency — though I suggest you set this to at least once a week.

Click on the “OK” button to create the alert.
If you want to read more about this, check out my article about setting up email notification alerts and other methods to notify a user of any changes.
How to use PowerShell to search the recycle bin
There is also a way to search the recycle bin using PowerShell. This is efficient especially when you have thousands of deleted files.
To get started, enter the code below (written by Salaudeen Rajack) on PowerShell in admin mode.
Make sure to replace the site URL and admin user name on the ##variables for processing:
#Load SharePoint Online Assemblies
Add-Type -Path "C:\Program Files\Common Files\Microsoft Shared\Web Server Extensions\16\ISAPI\Microsoft.SharePoint.Client.dll"
Add-Type -Path "C:\Program Files\Common Files\Microsoft Shared\Web Server Extensions\16\ISAPI\Microsoft.SharePoint.Client.Runtime.dll"
##Variables for Processing
$SiteUrl = "https://yourtenant.sharepoint.com/sites/yoursite"
$AdminUserName=""
$DeletedByUserAccount=""
#Get the password to connect
$Password = Read-host -assecurestring "Enter Password for $AdminUserName"
$Credentials = New-Object Microsoft.SharePoint.Client.SharePointOnlineCredentials($AdminUserName,$Password)
Try {
#Setup the context
$Context = New-Object Microsoft.SharePoint.Client.ClientContext($SiteUrl)
$Context.Credentials = $Credentials
#Get the site recycle bin
$Site = $Context.Site
$RecycleBinItems = $Site.RecycleBin
$Context.Load($Site)
$Context.Load($RecycleBinItems)
$Context.ExecuteQuery()
#Get all items deleted by particular user in Recycle bin
$DeletedByUser = $RecycleBinItems | Where {$_.DeletedByEmail -eq $DeletedByUserAccount}
Write-Host "Total Number of Items deleted by user:" $DeletedByUser.Count
#format output as table and print to console
$DeletedByUser | Select Title, DeletedByEmail, DeletedDate | Format-Table
}
catch {
write-host "Error: $($_.Exception.Message)" -foregroundcolor Red
You can also use the code below with the PnP PowerShell cmdlet Get-PnPRecycleBinItem:
#Config Variables
$SiteURL = "https://yourtenant.sharepoint.com/sites/yoursite"

#Connect to PnP Online
Connect-PnPOnline -Url $SiteURL -Credentials (Get-Credential)

#Get Recycle bin Items
Get-PnPRecycleBinItem | Select Title, ItemType, Size, ItemState, DirName, DeletedByName, DeletedDate | Format-table -AutoSize
If you want to export the recycle bin items to a CSV file so you can check on it more efficiently, simply use the following code:
#Config Variables
$SiteURL = "https://yourtenant.sharepoint.com/sites/yoursite"

#Connect to PnP Online
Connect-PnPOnline -Url $SiteURL -Credentials (Get-Credential)

#Get Recycle bin Items
Get-PnPRecycleBinItem | Select Title, ItemType, Size, ItemState, DirName, DeletedByName, DeletedDate | Format-table -AutoSize
Recycle Bin Important Reminders
Some notes you need to remember about the recycle bin:
Problems with restoring a site collection or a subsite
We didn’t touch much about site collection or subsites, mainly because they don’t belong in the usual recycle bin…
But if you’re trying to restore a site collection or a subsite and you encounter some problems, you can contact Microsoft for assistance.
SharePoint Online has a backup for all content for 14 days beyond the actual deletion. The caveat is that this only works for site collections or subsites.
For this, you or any admins can contact Microsoft Support and request a restoration — as long as it’s still within the 14 days period.
Unfortunately, you can’t request to recover a specific item since only requests for site collections or subsites are accepted.
Restoring a securable object brings back all its contents
A securable object is an object that has controllable access (like site lists, document libraries, folders, files, etc.).
When you restore a securable objective, all its contents when it was deleted are also brought back — without exception.
The concept may be a little hard to understand, so let’s discuss some examples:
- If you restore a deleted list with thousands of items, all items, including attachments, will be restored as well.
- If you restore a deleted document library, all files and documents in that document library will be restored.
- If you restore a deleted file with multiple versions, you will also bring back all its versions.
Container objects have to be restored first
This follows a rather simple logic:
To restore a deleted object that’s inside a deleted object, you need to restore the mother object first.
For example:
- If you deleted a file that’s attached to an item on a list, and you decided to delete the list afterward, you must restore the list first and then restore the attachment.
- The same goes for documents with multiple versions — if you deleted an earlier version, then you deleted the current version, you must restore the current version first before you can bring back the earlier version.
You can restore an object directly without restoring its folder first
This next rule sorts of ignores the first two:
If you deleted a file, and then its folder, and you decided to restore the file — you don’t need to restore the folder first.
Restoring the file directly will automatically bring back the folder. But this time, it will only contain the restore file, leaving the rest of its contents in the recycle bin.
On the other hand, restoring the folder will automatically restore all of its contents when the folder was deleted.
Accidents happen, so it’s great to know that whatever files or elements you deleted from your site won’t get purged right away.
Remember that there are two stages of the recycle bin — the deleted object will stay in the first stage for 93 days.
Once it’s deleted from the recycle bin or the given time to restore it has elapsed, it will then move to the second stage.
If you still didn’t restore it, the object will be forever purged from the system after staying in the second stage recycle bin for 93 days.
If you need to sift through thousands of deleted files, you can also use PowerShell and export the contents to a CSV file.
Do you have some questions regarding SharePoint’s recycle bin? If so, leave a comment below so we can discuss it further.
For inquiries and concerns, kindly use the contact page of my site and I’ll get back to you as soon as possible.


Hi,
A Teams user has restored a lot of files by accidant. How can I identify that files in our Teams filders?
Hi,
A site collection admin can not see the items deleted by other users under the Sub-Site’s Recycle Bin. How can we give Site Collection Admin Permission on Sub-Site’s Recycle Bin?
dear,
in site if admin user delete in site recycle bin, how to check that delete in second stage, seem i access site collection administration Recycle bin, it is same. and filel deleted not appeare>
Hello, I am still confuse about the concept of Second stage recycle bin storage
As I investigate in my tenant when I moved files from first stage recycle bin to second stage recycle bin ang checked the storage it is in decreased order from 3GB to 1GB
Does this mean second stage recycle bin doesnot occupy any space ?