
Last Updated on November 28, 2021
One of the main reasons businesses and organizations employ the Microsoft SharePoint Online services is to foster information sharing, content collaboration, teamwork, amongst many others.
Libraries are one of the many tools that make using SharePoint worthwhile.
It’s a location on a site where team members can create, upload, update and collaborate on files and display a set of accompanying files and notable information.
Furthermore, libraries are automatically included in the creation of the site — and there are different library types.
In this article, you will learn about using the site assets library and getting quick fixes to problems you might encounter when using it.
Table of Contents:
Why care about the site assets library?
The asset library helps collaborators manage and share digital media files or assets, like audio, image, and video files.
They allow users to easily discover, reuse and manage all digital media files that other team members have created.
For instance, corporate images, brand colors, logos, and other image files created or used by a team member are available to others.
Asset libraries also allow you to browse, manage and store media content types such as thumbnails, reusable content fragments, branded images and make them available to everyone on the organization’s network.
Sign up for exclusive updates, tips, and strategies
The built-in site assets library offers many important features which allow for the management of media assets such as image, audio, and video files.

Furthermore, some features of the site assets library include:
- Overlay callouts: Overlays are used to place a semi-transparent layer on top of an existing user interface (UI). They help the user focus on content placed above the added one, and they assist in creating a blocking or modal experience. They are intended for use with, particularly, landscape-oriented photos. Callouts can be floated to the left or the right of a site page.
- Digital asset content types: Digital assets are digital materials owned by individuals or enterprises, including graphics, text, videos, animations, and so on. They provide value to the company and should be therefore readily accessible and easy to distribute to team members and departments within the company. Common digital asset types include video files, PDF files, audio files, presentation, image files, design files, spreadsheets, and graphics. The asset library easily manages these types.
- Automatic metadata extraction for image files: Metadata extraction is the process of recovering an embedded set of data that gives detailed information and descriptions about other data. The assets library assists in the extraction of metadata for image files which summarizes basic information about the file and makes tracking and working with the specific file easier.
- Thumbnail-centric views: Thumbnails are reduced representations of a large visual media file such as a video or image file. Thumbnails are helpful for the recognition and organization of files, equivalently serving the role of indexes for those files.
How to create the asset library?
Suppose the site asset library is not available by default on your site. Fortunately, you can easily create one and leverage its benefits.
The following steps below show how to create one manually:
1. Locate the site where you want the library to be created or where you want to use it. Then, click on the quick settings icon (gear) of the site and select “Site contents”.

2. Normally, this is where you should find the site assets library. But if not, all you got to do is click on the “+New” button on the command bar and then select the “App” option.

3. Depending on your settings, you may be able to find the site assets app on the next page right away.
If you’re adding the site assets library for a classic site, you will have to click on the “classic experience” link on the next page.

Note: Creating an asset library requires you have been granted permission to create lists. If a user does not have enough permissions, they won’t see the “+ New” menu or the link to add an app.
4. On the next page, simply find the asset library app and click on it.

How to upload an audio or image file to an asset library
Suppose you want to upload an image or an audio file to your newly created library or an existing one. A site asset library works just like any library.
Follow the steps below if you want to upload a file to your asset library:
1. Navigate to the site assets library first. From the quick launcher bar on the left side of a team site home page, select “Site contents”.

The quick launcher bar on a communication site is found in the top corner.
Alternatively, you can click on the gear icon (settings) on the upper-right corner and then select “Site contents”.
2. Once you’re on the site contents page, simply click on the “Site Assets” folder to open it up.
3. Now, to upload a folder, file, or template to the library, click on the “Upload” button and select the type of file you want to upload.

A file explorer window will open where you can find and select the file, folder, or template you want to upload.
Alternatively, you can also upload anything directly to the site assets library by dragging the file you want to upload from a file explorer window to the browser tab.
Note: There are limits to the file size available for upload. Contact your administrator to know what size is allowed for upload because the maximum file size for upload varies.
Users of SharePoint Online might sometimes notice that the site asset library list is missing. This could happen for a variety of reasons, though this issue is commonly observed after migration.
Below are two ways to quickly fix the issue if it comes your way:
1. Enable video and rich media
One approach is to enable the video and rich media feature.
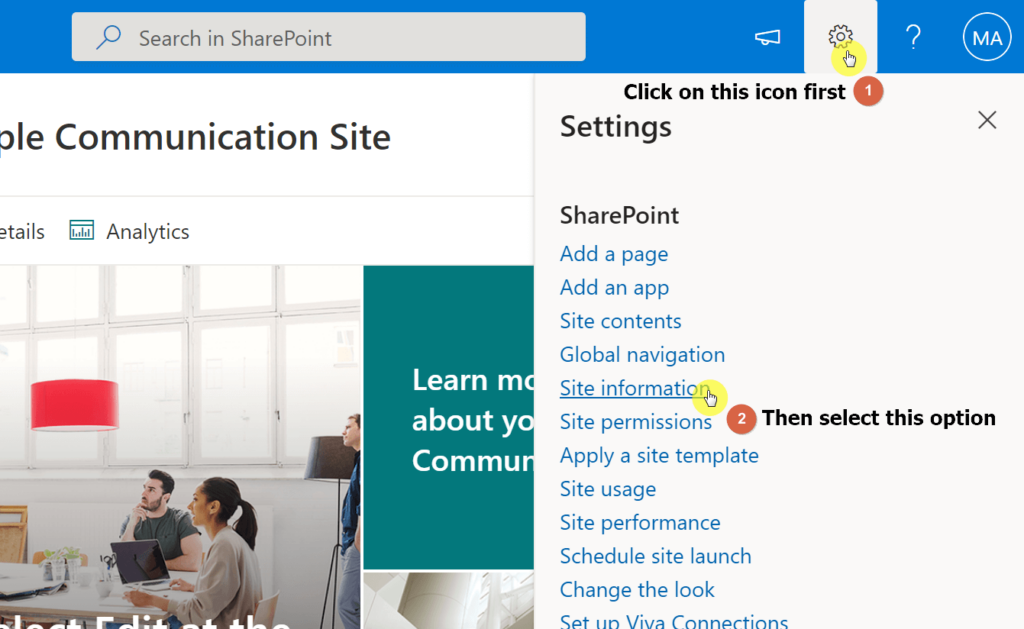
Navigate to the site where you want to enable this feature. On the home page, click on the gear icon at the upper-right corner and select the “Site information” option.
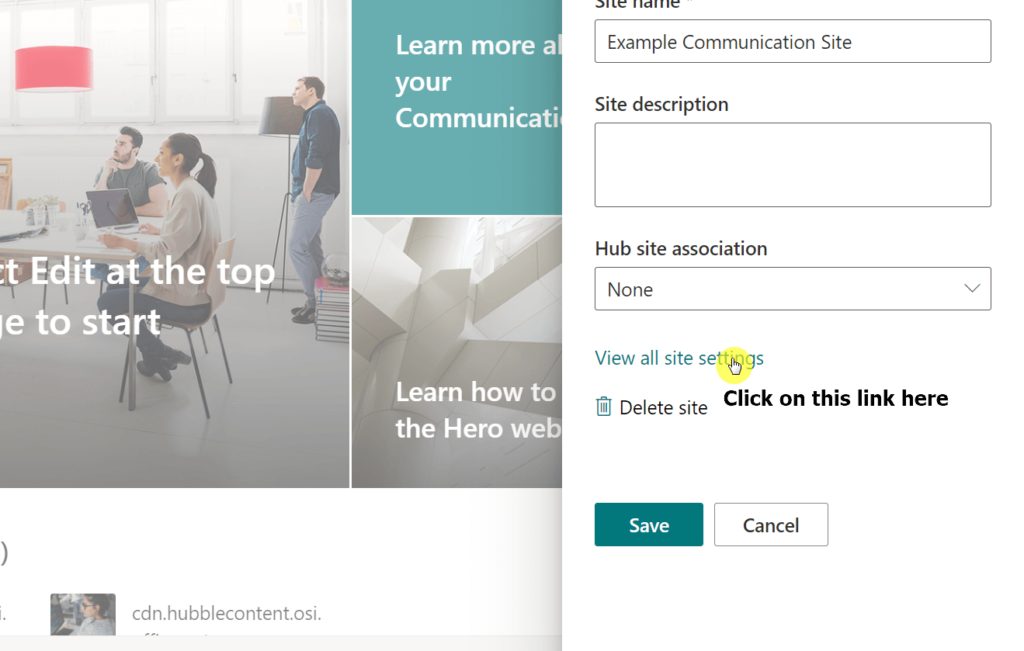
Then, on the site information panel, click on the “View all site settings” link at the bottom.
On the site settings page, click on the “Site collection features” link under the “Site Collection Administration” category.

Then, find the “Video and rich media” feature and click on its “Activate” button.

Through this, the site assets library and site pages will appear on your SharePoint Online site.
Note: You must have permission to change site collection features before enabling the video and rich media feature.
2. Use PnP PowerShell
Another approach is to use the PowerShell command window.
Instead of manually activating features like in the previous method, this one will programmatically ensure your site will have a site assets library.
Open your PowerShell window and enter the following command:
#Parameters
$SiteURL = "https://yourdomain.sharepoint.com/sites/portal"

#Connect to Tenant Admin Site
Connect-PnPOnline -url $SiteURL -Interactive

#Ensure Site Assets
$Web = Get-PnPWeb
$Web.Lists.EnsureSiteAssetsLibrary()
Invoke-PnPQuery
The command above will create the asset library for you.
If you’re not sure how to use PnP PowerShell, check out the “Using PnP PowerShell” section of my SharePoint modern site creation article.
The steps I explained above should help you restore the missing site asset library on your SharePoint Online site.
For more questions, drop them down in the comment section. For other inquiries, feel free to reach out to me directly through my contact page.


I have problem with the asset library in that I need a column that allows
Rich text (Bold, italics, text alignment, hyperlinks) and I just don’t get that option for a document library only a list. However the list is inadequate as an asset library. Are their any solutions?
We have a communication site hub where we have a site assets folder with images that has been working up until today. We can see the folder under site contents and can see the images in there, but when we creat a new post within the site, the folder does not show up. This just started happening today and we’ve changes nothing. Any thoughts?