

Last Updated on September 23, 2023
Sharepoint has many features, one of which is the ability to upload files and attachments into various document libraries.
This may seem easy and understandable to long-time users, but not so much to first-timers.
In this article, I will explain how to easily upload files and documents to a SharePoint library and tackle related topics as well.
Let’s get started.
Table of Contents:
- How to upload documents and files to a modern SharePoint site
- How to upload documents and files to a classic SharePoint site
- How to upload large files and documents to a library
- What you need to know about long path and file names
- How to require “check out” when uploading new files and documents
- How to approve uploaded files and documents before making them public
- Upload documents and files to your SharePoint library
One advantage of using the modern experience in SharePoint is how easier it is to use than its classic counterpart.
For example, uploading documents and files is literally a drag-and-drop away.
Navigate to the library in your SharePoint site where you want to upload the document and file.
Then, open Windows Explorer. Find your document (or file) and drag it to the tab that shows your library.

If the drag-and-drop method is unconventional for you, you can always resort to using the traditional Upload button.
Simply click on the Upload button on the library and select the type of file you want to upload.

A Windows Explorer will open where you can select the file or document you want to upload to your SharePoint library.
If your library doesn’t look like the screenshots you see above, then you’re in the classic version.
Fortunately, you can always transform classic sites into modern ones.
Sign up for exclusive updates, tips, and strategies
For those who operate a classic site, your only choice is to manually upload a file or document.
Some classic sites may show an indication that you can use drag-and-drop on them since they’re created through the modern experience.
For that reason, I’m only going to show how to use the manual option since the drag-and-drop feature typically works the same.
Navigate to your classic SharePoint library first and click on the Upload button.
A window will appear on the browser where you can choose the file and even add some comments on it.

Simply click on the OK button to continue with the upload.
Note that unlike in the modern experience, you can’t upload an empty file, document, or folder to a classic library.
If you do so, you will get an upload error like the one below:

How to upload large files and documents to a library
Can you upload multiple files and documents at once with large sizes?
Yes, with some limitations. You can even upload multiple folders at once to your SharePoint library using the methods you learned earlier.
The reason why I mentioned “limited” is that there are three requirements when moving and copying multiple files in a single operation:
- The upload must be less than 100 GB in total file size
- The upload must have less than 30,000 files
- Each file or document must be less than 15 GB in size
Furthermore, you may also face the error below after uploading the files:

This is due to the 5,000-item limit threshold in SharePoint in displaying the vast amount of information.
Microsoft introduced this feature to maintain the performance of the library and its servers.
There are three primary ways to fix the problem:
- Lower the number of files to less than 5,000
- Reorganize the whole library
- Provide metadata properties
Fixing this problem is a little out of scope in this article.
But you can always read the guide I wrote about resolving the SharePoint 5,000-item limit threshold.
What you need to know about long path and file names
When uploading files and documents to SharePoint, you also need to be aware of path lengths and file names.
One limitation with OneDrive and SharePoint is that the file path of your files can’t have more than 400 characters.
This applies to both the folder path and file name after decoding.
If you’re confused, the file path simply refers to the link of the file on your SharePoint site.
Here’s an example of a file path:
- https://tenantname.sharepoint.com/sites/example/documents/sample%20document/sample/sample%20file.doc
The limit here starts after https://tenantname.sharepoint.com/.
To help with counting the characters, you can use lettercount.com.
Simply paste the file path into the form and hit the Count characters button.
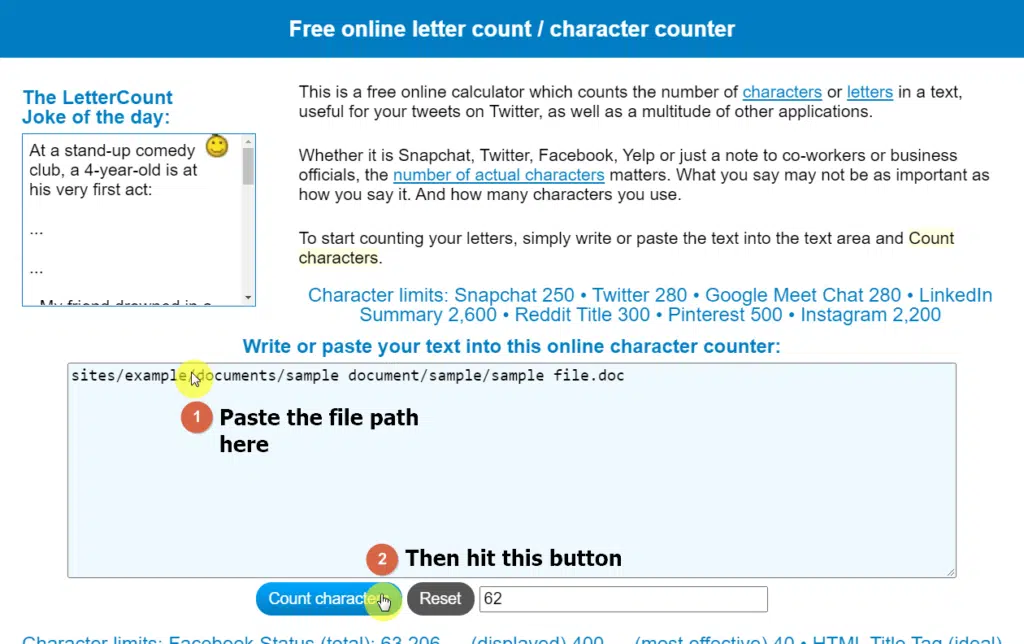
You will then see the character count at the bottom.
Note that you don’t have to do this for every file you have. Only count the characters for files you think are too long.
Even better, simply make those file names shorter when possible.
How to require “check out” when uploading new files and documents
Some libraries have the require check out feature enabled where users must check out first to make changes in the library.
This doesn’t really affect your ability to upload a file or document to the library.
But you will have to check in what you uploaded so others can make an edit.
For example, once you upload a file or document to a library with the require check out feature enabled, you will see a red downward arrow.
To check in the file or document, simply hover your mouse over the red arrow and click the Check in link.

A window will then appear where you can provide some comments on the file or document you’re checking in.
The comment is optional, and you can proceed with clicking the Check in button right away.

The red arrow will now disappear and your colleagues will be able to check in and make some edits to the document or file.
How to approve uploaded files and documents before making them public
Some libraries may also require content approval for uploaded files.
This means files and documents uploaded to that library will remain in a draft state, which renders it invisible to others until it’s approved.
As the site owner, you will always see the file uploaded.
If the content approval feature is active, you will see an approval status column in your library and see whether a certain file is pending or approved.
Related: Microsoft Flow Approval: Multiple Approvers (2023 Guide)

To approve an uploaded file or document in the library, simply right-click on that file, go to More, and click the Approve/Reject option.

Another window will then open where you can specify which approval status you want the file to be in.
To make the file available to all users, choose the Approved status and click on the Ok button.

I hope you found this article informative and are now more comfortable uploading documents and files to your SharePoint library.
I mentioned related questions and topics you may encounter through this process so you don’t have to keep on searching online in case something unexpected happens.
If you’re a first-time user, you can always bookmark or save this article for future reference.
As always, if there is anything else that needs clarification or explanation, drop a comment below.
For inquire and more private matters, feel free to send me a message on my contact page and I’ll get back to you as soon as I can.


very helpful, thank you Ryan for the insight on this topic.👍