
![[Guide] How to Create a Custom List in SharePoint Online](https://mrsharepoint.guru/wp-content/uploads/2022/03/laptop-on-a-table-with-camera-lens-1024x683.jpg.webp)
Last Updated on April 30, 2023
Do you need to create a custom list in SharePoint Online?
Over the years, especially with the ongoing update of the modern experience, it’s now easier than ever to create your own custom list.
In this article, we’ll cover the steps to creating your own custom list in SharePoint Online and what additional configurations you can make.
Let’s get started.
Table of Contents:
There are various ways to create a list in SharePoint. Right now, you can directly start with a blank canvas quite easily.
Here are the steps to take to create a custom list:
1. Create a blank list
First off, head over to the site where you want to create a custom list.
Once there, click on the “New” button on the command bar. Select the “List” option from the dropdown.

On the new window, click on the “Blank list” button.

After that, you will be able to give the new list a name (required) and a description (optional). You can also opt to show the new list in the site navigation or not.
After this step, I used to tell my clients to enable the item version history as well in the list. But Microsoft recently made an update and enabled the feature by default.
Note: By default, the item version history will autosave the last 50 versions of an item in the list (500 for document libraries). You can change this on the “List settings”.
2. Disable attachments (optional)
This one isn’t really a requirement — but it will be easier later on if you disable attachments for your custom list.
Here’s why:
- Lists have no document management features (unlike document libraries). You will not have complete control in terms of check-in/out, co-authoring, editing documents in the browser, and others. It’s also a hassle to manage and track documents.
- You can’t apply specific metadata on an attached file. It also follows that you can’t organize them properly (like group them in folders).
- No item version history on the attached document. The list item has version history, but the file attached has none.
Now, you can either tell your users not to attach anything — or completely disable the feature for the custom list.
To do that, go to the “List settings” first via the gear icon.
Next, go to the “Advanced settings”.

On the next page, scroll a little until you see the “Attachments” settings.
Select the “Disabled” option and click on the “OK” button at the end of the page.

Again, this isn’t a requirement. There may be a handful of instances where enabling attachments can help (like in cases of databases or logs).
But in most use cases, you’re off disabling attachments. If you need it badly, you can also use document sets to add folder level metadata with your custom list.
3. Create custom metadata columns
We’re now ready to create metadata columns in our custom list.
Similar to any list you can create in SharePoint, the type of metadata (column) you can use are:
- A single line of text
- Multiple lines of text
- Choice
- Number
- Currency
- Date and time
- Lookup
- Yes or No
- Person or group
- Hyperlink or picture
- Calculated
- Image
- Task outcome
- External data
- Managed metadata
To add a new column, click on the “+Add column” and select the type of metadata you want that column to contain.
To see more choices, you will need to click on the “More…” button.

For this custom list, let’s pretend we’re creating a basic sales customer relationship management list, which has the following columns:
- Name (Title)
- Company (Single line of text)
- Status (Choice)
- Priority (Choice)
- Estimated value (Currency)
- Account Owner (Person)
- Email (Single line of text)
Since all the columns we want to add are in the given list, there’s no need to go to the backend (clicking “More”).
When you create a new column, you will be able to see the various options relevant to that metadata.
For example, creating the “Company” column has the following options:
- Default value
- Use calculated value
- Maximum number of characters
- Column validation
- Many others

On the other hand, adding the “Status” column provides other options that apply only to “Choice” columns like:
- Choices
- Manual addition of values
- How to display the choices
- Allow multiple selections
- Many others

Different columns have their own unique configuration options. Some may have sorting or filtering functions while others may only show column settings.
Continue adding all the columns you need for your custom list. Feel free to rename the column headers as you see fit.
For example, the first column which contains the “Title” of the list item can be changed. In the example, I renamed it to “Name” as it’s more fitting for a sales CRM list.

4. Create data entries (list items)
Now that you have all the columns you need, it’s time to start putting in your list items.
To start with, click on the “New” button on the command bar of your list. It will open a right panel where you can enter the data for that item.

Don’t forget to click on the “Save” button once you finish filling out the data for that list item.
Do this until you finish entering all the data entries you currently have for your custom list.

Congratulations! At this point, you already have a working custom list that you can use.
If you want to add some more functionalities and configurations, read on…
Sign up for exclusive updates, tips, and strategies
How to create custom views for your custom list
Like with any list in SharePoint, you can also create a custom view for your custom list to view the information in the best way that suits you.
Now, the view you’re seeing now on your custom list is actually the “default” view — and I don’t recommend changing it.
The default view is like the mother view that shows you all the items in the list without filters or groups. If you change it, you risk hiding content without even knowing it.
Instead, you must create a new view to customized:
- Click on the view icon on the command bar
- Select the “Create new view” option

Then, give the new view a name and select how you want to view the list.
Checking the visibility option will enable anyone to use the new view that you created.
Click on the “Create” button to proceed.

After that, you can now edit the view as much as you wish.
Click on the view icon again and this time, select the “Edit current view” option.
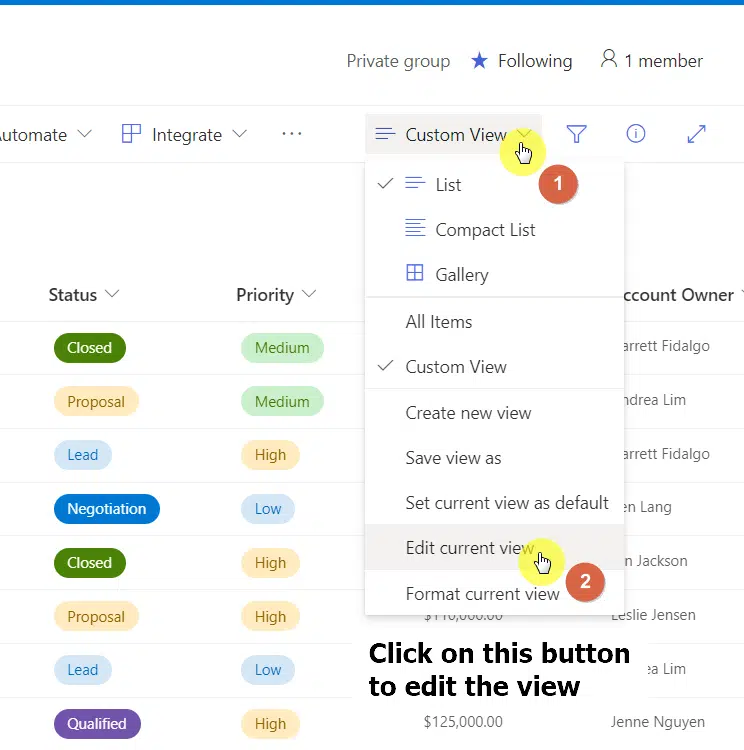
This will open a new page where you can customize the following elements:
- Columns (show/hide and change positions)
- Sort
- Filter
- Tabular view
- Group by
- Totals
- Style
- Folders
- Item limit
- Mobile
There are so many customizations you can do here.
To give you an example, you can create a high-level filter and show items only when certain conditions are met.

There are also filter options and other view settings in the front-end — though they’re not as powerful as what you see on this page.
Experiment with the different view settings to achieve your desired view.
Additional configurations for your custom list
Here are some ways to add other functionalities to spice up your custom list:
Enable approval status
If you want others to contribute to your custom list and you want to set up some way to see their contributions first, then this is the way.
SharePoint Online has a content approval feature on its list that you can easily enable:
- Navigate to the “List settings” page of your custom list
- Click on the “Versioning settings” link

Then, follow these steps:
- Select the “Yes” button for the “Require content approval for submitted items” setting
- Make sure that on the “Draft Item Security” setting, the “Only users who can approve items” option is selected.
Click on the “OK” button to save the changes.

If you go back to the default view of your custom list, you will now see another column called “Approval Status” which shows whether the list item is approved/rejected.
There is one other column added behind the scenes called “Approver Comments” since you can actually write a comment when approving/rejecting a list item.
If you like, you can also set up alerts so you can receive email notifications when someone adds a new list item for you to check.
Click on the “Alert me” button on the command bar first.

Configure the alert as you like including the title, recipients, and the delivery method.
On the bottom part, make sure to select “New items are added” and click on the “OK” button.

If you’re interested in alerts, check out my article on how to set up SharePoint email notification alerts.
Create a flow through Power Automate
To follow up on the item above, you can also create automation to start the approval process when a new item is added.
This is done through Power Automate — a process automate tool where you can input or design a flow involving a sequence of tasks or events.
To start creating a flow for your custom list, follow these steps:
- Expand the “Integrate” menu on the command bar
- Hover your mouse over “Power Automate”
- Click on the “Create a flow” option

The beauty of creating a flow through Power Automate is that you don’t have to start from scratch (although you can if you want to).
After clicking on the button earlier, you will see some templates to start with. Simply click on a flow you want to execute.

You will then get to a page where you can see which apps the flow will connect to and continue from there.

If you opt to continue, you will be able to see the actual flow process itself and edit the parts that you want.
Editing the process itself may be a little hard for beginners — although you can understand it if you try hard enough.
To learn more about automation with Power Automate, check out my article on the basics of SharePoint Flow where I discussed this topic in more detail.
Enable item-level permissions
If you enabled the approval status, then you may find the item-level permissions setting useful.
Basically, this setting will allow you to zoom in on the item-level permissions — like restricting users only to see items they created.
To do this, visit the “Advanced settings” from the “List settings”.
Once there, you can change the item-level permissions.
For example, in the custom list I made, I want users to only read items they created.

Create an app based on the custom list
Did you know that you can create an app based on your custom list?
Microsoft has a tool called Power Apps that allows you to create any business app even without knowledge of coding or app development.
To create an app based on your custom list, start with these steps:
- Expand the “Integrate” menu on the command bar
- Hover your mouse over “Power Apps”
- Click on the “Create an app” option

A panel will then slide in from the right where you can enter the name of your app.
Once you enter the name, click on the “Create” button to proceed.

You will then arrive on the Power Apps canvas where you can check the outcome and continue further configuration.

From here, you can then share the app with others.
As I wrote at the beginning of this article, creating a custom list in SharePoint Online is now easier than ever, thanks to the modern experience.
You simply need to:
- Create a blank list
- Disable attachments
- Create custom metadata columns
- Create data entries
You can then spice it up by adding other functionalities like:
- Enabling the approval status
- Creating a flow through Power Automate
- Enabling item-level permissions
- Creating an app based on the custom list
On the other hand, if you find starting from scratch a little troublesome, you can always create a list without starting a scratch like:
- Use a premade template
- Based on an Excel file
- From an existing list
Now, do you have some questions regarding how to create a custom list? If so, make sure to write a comment below.
For inquiries and concerns, please use the website’s contact form to reach out and I’ll get back to you as soon as possible.


