

Last Updated on November 16, 2023
Did you know that SharePoint has a feature that seems like a blend of folders and metadata columns?
Well, you guessed it, it’s called “document sets”. It’s a cool feature in SharePoint that you may not know about unless someone tells you about it.
In this article, I’ll share with you everything I know about document sets in SharePoint, how to create one, and many others.
Let’s get started.
Table of Contents:
Microsoft defines a document set in a simple manner:
A Document Set is a group of related documents that you can manage as a single entity.
When you go deeper, it’s actually a special type of content where you can group documents together in a folder-like structure.
Within the document set, you can define metadata that can be inherited by each file uploaded or created in the document set.
For example:
- You can run an agency where you produce standard documents related to things like content, design, and onboarding.
- Those documents might be made by a single person only or by a team. The documents may also be in various formats and might be done at the same time or in phases.
- With a document set, you can manage those documents easily since you can see them in a single view and manage them as a single entity.
Document sets are a good fit for managing:
- Legal documents
- Client documents
- Finance-related documents
This is definitely a good question. In fact, as you may have seen, navigating through a document set feels like navigating through a folder.
However, there are some differences here:
- Document sets allow you to manage metadata and share a column with all the documents in the set.
- You can manage and update all the documents in a document set all at once.
- You can create a folder right inside a document set and create a document set inside a folder.
- You can’t create a document set inside a document set.
- Folders get reflected on OneDrive Sync while document sets don’t get reflected (metadata stays on SharePoint).
Sign up for exclusive updates, tips, and strategies
Document sets have a lot of features that will enable you to create and manage related documents quite easily.
Some of them include the following:
- Customize a welcome page where a user can read information about the set. The welcome page can have project information or resources. It can also contain a list of the documents in the set.
- Specify the default content that you want to be automatically included in the document set. It’s also possible to control the templates that users use.
- Allow specific content types in the document set.
- Specify the type of metadata columns to include in the set.
- If you have existing workflows, you can assign workflows to use in the document set like the “standard review” or “approval workflow”. Naturally, you can also create your own custom workflows for document sets.
- Set the document set to have the files inherit its metadata
Note: The welcome page feature in the modern experience is not that prominent. It’s displayed like a folder or a document in a library.
Document set authors can do things like:
- Use the new document button in the document library to create a new multi-document product
- Capture a version history snapshot of all the current documents and their properties within the document set
- Manage common tasks by using workflows on the document set or individual documents
- Share a link to the document set to others
- Move or copy the document set to another location
- Manage permissions for the document set
It’s easy to create a document set in SharePoint, though it takes a bit of time. Below is a step-by-step guide on how to create a document set.
Step 1: Enable the document set feature
The first is to activate the document set feature first on the site settings page.
Navigate to your SharePoint site and follow these steps:
- Click on the gear icon on the upper-left portion
- Click on “Site information” from the options
- Click “View all site settings” on the panel

Then, navigate to the site collection features:

Find “Document Sets” on the next page and click on the “Activate” button on its right side:

Step 2: Create a document set content type
As I discussed earlier, a document set is a special type of content. You need to create this first on your site before you can start using this on a document library.
Follow these steps first:
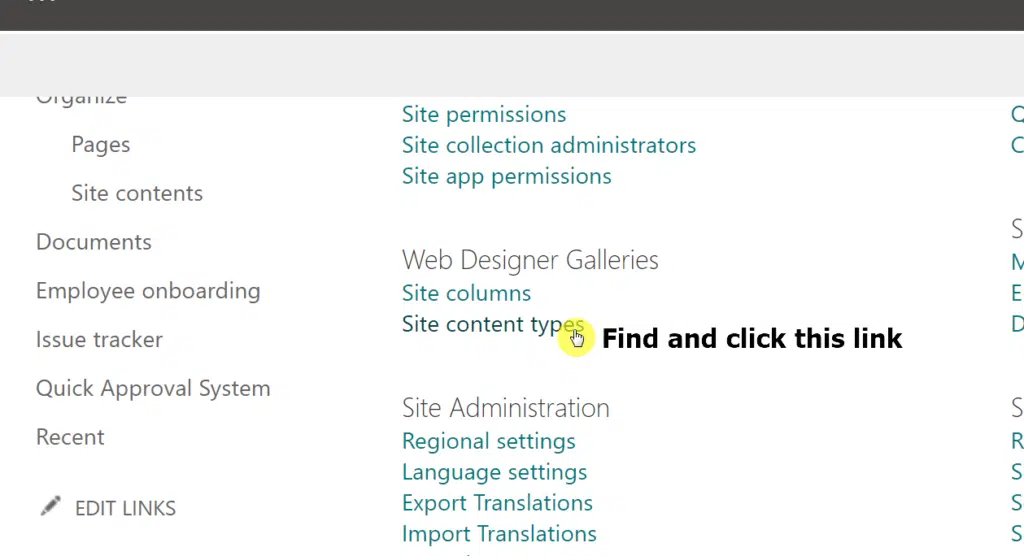
- Go back to the site settings page
- Click on “Site content types” under “Web Designer Galleries”
On the next page, click on the “Create content type” button:

On the panel on the right, enter the following information:
- Name: The name of your new document set
- Category: Use an existing category and choose “Document Set Content Types”
- Parent category: Document set content types
- Content type: Document set (no other choice here)
Note: If you can’t find “Document Set” on any of the options, that means the document set feature isn’t activated yet.
Then, click on the “Create” button.

Congratulations! You now have a new content type in the gallery.
Don’t close the tab yet or go to another page as we still have some work to do…
Related: How to Create a Global Content Type in SharePoint Online
Step 3: Add columns to the new content type
Once you have successfully created a new content type, the system will take you to its gallery page where you will be able to add columns.
To proceed:
- Click on the “Add site column” button
- Select either “Create new site column” or “Add from existing site columns”

For this example, I will choose to create two new site columns:
- Project Title
- Project Deadline
Feel free to add your own site columns. Think of the type of data you want to include or tag your documents with on the document set.
Step 4: Add the document set content type to a document library
In this step, it’s time to navigate to the document library where you want to create the document set.
Once there:
- Click on the gear icon on the upper-left section of the page
- Click on the “Library settings” button
On the library settings page, click on “Advanced settings” to proceed:

On the settings for “Content Types”, you will need to allow its management so click on the “Yes” radio button here.

Click on the “OK” button at the bottom of the page.
The system will bring you back to the library settings page. Because of your earlier action, you will now see a section about content types.
Click the “Add from existing site content types” in this section:

On the next page:
- Find the name of the document set on the left box
- Click on the “Add” button
- Click on the “OK” button

With that, you have successfully added the document set content type to the library. Once again, don’t close the tab right away.
Step 5: Configure the document set
Now, back to the library settings, find and click the name of the document set under the content types section.

On the next page, click “Document Set settings” to proceed:

Now, there are a few things you can set on the document set settings page:
- Allowing specific content types
- Specify default content
- Specify shared columns
- Specify welcome page columns
- Specify welcome page view
- Custom the welcome page

Simply change what you want from here. The procedures required are all self-explanatory so you won’t have a hard time understanding all the options and buttons.
When you’re done, click on the “OK” button at the bottom of the page. From here on, you can now create a new document set in the library.
How to create a new document set in a document library?
Now that you have completed the necessary steps to set up and configure the document set content type, it’s time to add a new document set.
Follow these steps:
- Navigate back to the main document library page
- Click on the “New” button
- Click the name of the document set content type

On the next page, simply fill out the name, description (optional), and the additional metadata that you opted to create.
Once you’re done, click on the “Save” button at the bottom.

Right after that, the system will bring you inside the document set:

How to add documents to a document set?
Adding documents to a document set is fairly the same as how you add documents to a document library in SharePoint.
You can do it by dragging:

By using the upload button:

Note: The only files you can upload or create are only those that are included in the “allowed content types for the document set”.
Document sets are helpful as they save you time by giving you the ability to update and manage all the documents in the set at once.
As you have read earlier, setting it up takes a little time. But all the steps are fairly easy to do — with many of the things you only need to do once.
Anyway, do you have any questions regarding document sets? If so, kindly leave your question in the comment section below.
For inquiries and other concerns, please use the site’s contact form to reach out and I’ll get back to you as soon as possible.


An awesome post, everything is very clear and it works perfectly. Many thanks!!
Thanks for the write up. One of my favorite classic features… had no idea there was modern support until seeing it discussed on reddit earlier today.